Date questions allow users to respond with a specific date as their answer. Date questions are designed to capture data such as date of birth or last purchase date information in a condensed and accurate format.
To add a date question, you can follow these steps:
- Access the Back Room > Research Tools > SurveyMR 2.0
- Either click 'Add Survey 2.0' to add a new survey, or click into an existing upcoming survey.
- In the surveys' build tab, add a new question by first clicking and dragging the 'form' box from the left of the page onto the canvas, or edit an existing form by clicking on the edit icon in the top right corner of the form.
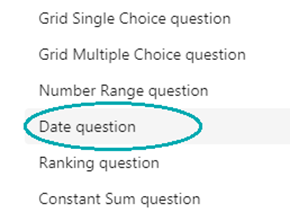
- Open the drop-down menu, and choose “Date question”
- Once selected, input the question text as usual in the question box.
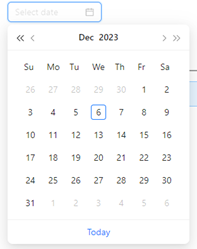
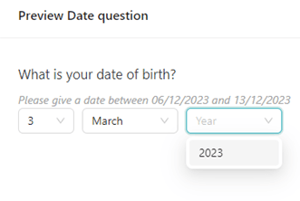
- Next, select the style you would like the answer field to be; ‘calendar’ or ‘drop down’
![]()
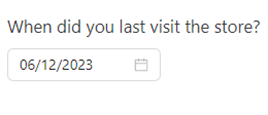
‘Calendar’ view will display this way to users:
‘Drop down’ view will display this way to users:
- You can choose to set an earliest, latest, and initial date, or leave this section blank if you do not wish to set these parameters
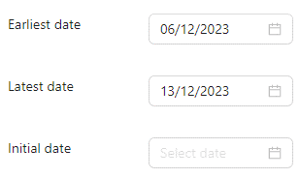
The earliest date is the earliest date from which users will be able to select their answer, e.g., if your ‘earliest date’ is set to 03/12/23, users could not select 02/12/23.
The latest date is the latest date up to which users will be able to select their answer, e.g., if your ‘latest date’ is set to 25/12/23, users could not select 26/12/23.
The initial date is the date show to users within the answer field when they first view the question. You may prefer to leave this blank, or to populate the field initially, dependent upon personal preference.
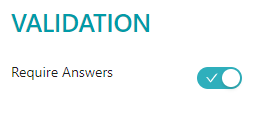
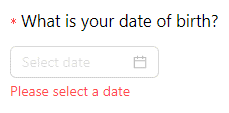
- Next, in the validation section of the form, tick if you would like to ‘Require Answers’
- Once you are satisfied with the setup of your question, click ‘Submit’.